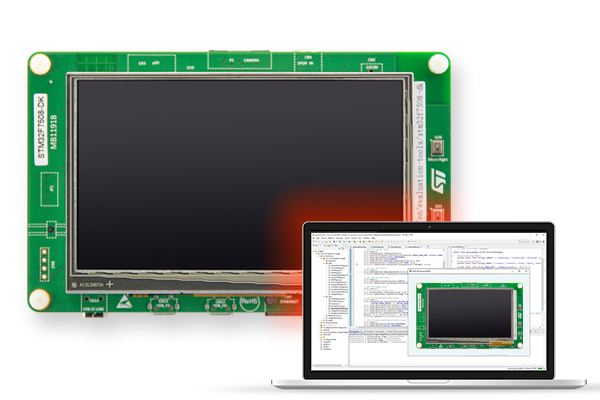
This Getting Started will show you how to extend a pre-built Multi-Sandbox VEE Port for the STM32F7508-DK Discovery Kit.
This pre-built VEE Port will enable you to quickly develop and deploy a Java application, as you will not need to set up a C Toolchain, build the BSP, or flash the whole firmware.
Pre-build VEE Ports come with uneditable hardware features. If you wish to extend them, please consider building a VEE Port for the STM32F7508-DK Discovery Kit instead.
In this section, you will learn how to:
〉 create a first Sandboxed Application,
〉 run a Sandboxed Application on the Virtual Device,
〉 run the same Sandboxed Application on your STM32F7508-DK Discovery kit.
In case you are not familiar with MicroEJ, please visit Discover MicroEJ to understand the principles of our technology.
For this Getting Started, all you need is:
〉 MICROEJ SDK 21.11 installed (Please refer to Download and Install – MicroEJ Documentation),
〉 an Internet connection to access Github repositories & MicroEJ Central Repository.
〉 an STM32F7508-DK Discovery kit,
〉 a microSD card formatted as FAT32,
〉 an RS232 Terminal (e.g. Termite),
〉 STM32CubeProgrammer installed to flash a firmware on your board.
〉 Start MICROEJ SDK.
〉 Select an empty workspace.
If you launched the SDK for the first time and you are not familiar with Eclipse workspaces, select the default one and press OK.
If not, create an empty directory and select it as a workspace.
〉 Select the MicroEJ repository where to import MicroEJ architectures from.
If you launched the SDK for the first time and you are not familiar with MicroEJ repositories, select the default one and press OK.
If not, create an empty directory and select it as a workspace.
〉 Select Help > Check for Updates and install the latest SDK version by following the Update SDK Version instructions. You will be prompted to restart the SDK.
〉 Close the Welcome page.
You are now ready to import the projects.
〉 Download the Virtual Device GREEN-STM32F7508-DK-1.2.0.vde.
〉 Download the Multi-Sandbox Firmware GREEN-STM32F7508-DK-1.2.0.out.
If you want more informations about this Multi-Sandbox Firmware, the Javadoc and the Release notes are available in this directory.
Set up your STM32F7508-DK Discovery kit:
〉 Insert a microSD card (formatted as FAT32)in the board connector.
〉 Connect the Ethernet connector to the internet.
〉 Connect the USB connector of the board to your computer with a mini-USB cable by following the Board Configuration instructions.
Set up STM32CubeProgrammer:
〉 Open STM32CubeProgrammer.
〉 Go to External loaders tab in the menu.
〉 Select STM32F7508-DISCO board in the Available external loaders list.
〉 Click on Connect green button and wait until your board is connected.
Set up the logs output:
〉 Get the COM port where your board is connected (if you are using Windows, you can open your Device Manager from the Windows menu).
〉 Set up a serial terminal (e.g. Termite) to see output logs from the board. Set it with the COM port retrieved previously and by following Logs Output instructions.
Deploy the Multi-Sandbox Firmware:
〉 Go to Erasing & Programming tab in the menu of STM32CubeProgrammer.
〉 Point File path to your Multi-Sandbox Firmware (GREEN-STM32F7508-DK-1.2.0.out file).
〉 Click on Start Program.... Wait for the programming to finish.
Sometimes, the programming may failed. Repeat it until it succeeds.
〉 Click on the Reset button of the board by following the Board Configuration instructions.
〉 Get the IP address of your board. You will find it in the logs output.
The Multi-Sandbox Firmware is running on the STM32F7508-DK Discovery kit and is ready to be used.
Back to the SDK:
〉 Select File > Import > MicroEJ > Virtual Devices.
〉 Point Select file to where you download the Virtual Device (GREEN-STM32F7508-DK-1.2.0.vde file).
〉 You should see VDE-GREEN appearing in the Target list, make sure it is selected.
〉 Accept the MicroEJ Studio License Agreement then click on the Finish button.
The Virtual Device has been imported to your workspace and is ready to be used.

Your environment is ready to be used.
Now, you will learn how to create a Sandboxed Application and how to deploy it on your board.
Make sure that your MicroEJ SDK version is up to date by following the Update SDK Version instructions.
Create a new Sandboxed Application in the MicroEJ SDK:
〉 Select File > New > Sandboxed Application Project.
〉 Choose a Project name (e.g. myFirstSandboxedApp).
〉 Click on the Finish button.
Your new Sandboxed Application is created and imported into your workspace.
〉 Open the module.ivy file located at the root of your new Application.
〉 Go to <dependency org="ej.api" name="kf" rev="1.6.1" /> line.
〉 Modify the version of the library and set 1.5.1 instead of 1.6.1.
〉 Save module.ivy file.
Run the Sandboxed Application on the Virtual Device:
〉 Right click on the Sandboxed Application project in the package explorer.
〉 Select Run As > 2 MicroEJ Application.
〉 Select MyFeature and click on the OK button.
〉 Select VDE-GREEN and click on the OK button.
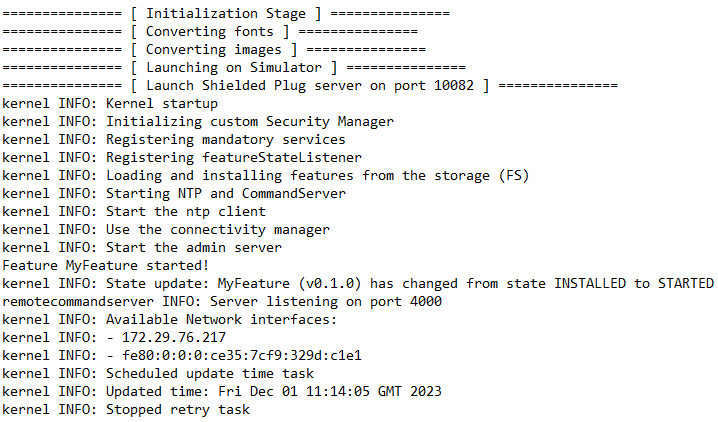
〉 The application is running on the Virtual Device. You should have the following output in your Console:
Run the Sandboxed Application on the STM32F7508-DK Discovery kit:
〉 Go to Run > Run Configurations... > MicroEJ Application.
〉 Select myFirstSandboxedApp MyFeature launcher created previously.
〉 Go to Execution tab.
〉 In the Execution section, check Execute on device.
〉 In the Settings list, select Local Deployment (Socket).
〉 Go to Configuration tab.
〉 Select Local Deployment (Socket).
〉 Insert the IP address of your board in the Host field.
〉 Click on the Run button.
Your application is running on your STM32F7508-DK Discovery kit. You can check it in the logs output of your board.
To be able to quickly run a Standalone Application in a Sandboxed environment, we will call the Widget Demo main standalone entrypoint from (myFirstSandboxedApp), the application created in the previous section.
Download the Widget Demo sources using the following command:
git clone -b 7.5.1 https://github.com/MicroEJ/Demo-Widget.git
If you don’t have Git installed, you can download the source code directly from our GitHub repository. Then you can click on Code > Download ZIP.
Import the projects in the SDK:
〉 Select File > Import > General > Existing Projects into Workspace.
〉 Point Select root directory to where you cloned the sources.
〉 Click on the Finish button.
The application project com.microej.demo.widget is imported in your workspace. After dependencies resolution it should compile without errors.
Add the widget demo as dependency of myFirstSandboxedApp that will be resolved in workspace:
〉 Open the module.ivy file located at the root of the myFirstSandboxedApp Sandboxed Application created in the previous section.
〉 Add <dependency org="com.microej.demo" name="widget" rev="7.5.1" /> line to the dependencies.
〉 Save module.ivy file.
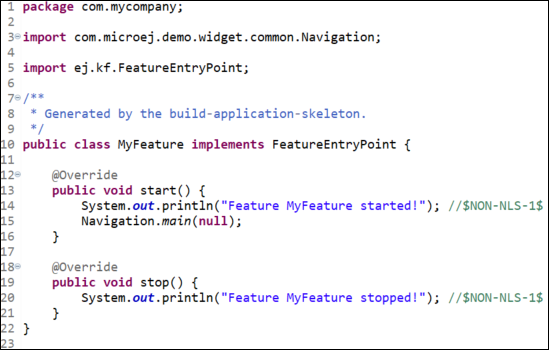
〉 Open MyFeature.java file located in the src/main/java/com/mycompany</code directory of your Sandboxed Application.
〉 Add Navigation.main(null); line in the start() method.
At this stage, MyFeature class looks like this:
Run the Widget Demo on the Virtual Device:
〉 Go to Run > Run Configurations... > MicroEJ Application.
〉 Select myFirstSandboxedApp MyFeature launcher.
〉 Go to Execution tab.
〉 In the Execution section, check Execute on Simulator.
〉 Click on the Run button.
The Virtual Device starts and executes the Widget Demo application.
Run the Widget Demo on the STM32F7508-DK Discovery kit:
〉 Go to Run > Run Configurations... > MicroEJ Application.
〉 Select myFirstSandboxedApp MyFeature launcher.
〉 Go to Execution tab.
〉 In the Execution section, check Execute on device.
〉 In the Settings list, select Local Deployment (Socket).
〉 Go to Configuration tab.
〉 Select Local Deployment (Socket).
〉 Insert the IP address of your board in the Host field.
〉 Click on the Run button.
Demo Widget application is running on your STM32F7508-DK Discovery kit.

To discover insights about MicroEJ technology, please follow some of the entry points below. You will find useful links to our documentation and our GitHub. You will also discover important feature of the MicroEJ technology.
You will find various examples of Sandboxed IOT Applications in our GitHub such as:
〉 MQTT example: it publishes MQTT data to a regular MQTT broker.
〉 Resty example: it is a simply Resty example using https connecion.
〉 WebSocket example: it connects to echo.websocket.org over TLS.
If you want to know more about Multi-Sandbox, you might find some interesting links in our documentation:
〉 Sandboxed Application: it explains how to create, test, and publish your Sandboxed Application.
〉 Kernel Developer Guide: it explains how to create your own Multi-Sandbox Firmware.
Now you can take a look at our MICROEJ development documentation and read parts useful to the growth of your software solution.
Below you can find some important chapters:

On our GitHub, there are some examples, MicroEJ VEE Port sources, or documentation about embedded challenges. Here are some examples:
Here is a list of different features about MicroEJ that could be interesting to you:

If you have any issue, you can go to our forum and look if there is already a topic about this issue. If not, ask us the question and our experts will be happy to answer.

How can we help you? Our technical support team is here to help if you have any issue or technical question about MicroEJ. Send your technical support request by email and we’ll connect you to one of our experts.