![]()
![]()
Develop multi-languages (C, Java, etc.) applications on Espressif ESP32-WROVER-KIT V4.1 development board with MicroEJ Software Development Kit.
Follow the steps below to get your first app running on both a virtual device, and a real device (final hardware). In case you are not familiar with MicroEJ, please visit Discover MicroEJ to understand the principles of our technology.
MICROEJ SDK is an IDE built on Eclipse for creating feature-rich applications for MicroEJ Virtual Execution Environment (VEE).
MICROEJ SDK runs on all popular desktops operating systems: Windows (7, 8, 8.1, 10), Linux, macOS.
A Java™ Runtime Environment 8 is needed on your host computer for running MICROEJ SDK. Download Java™ Runtime Environments
Click the below button to download the installer package corresponding to your host computer OS (about MICROEJ SDK download).
Help, then Check for Updates
MicroEJ provides various VEE samples, all called out of different colors, to distinguish the various APIs these VEE provided to the applications.
Launch.OK.Window > Preferences > MicroEJ > Virtual Device menu.Import... button and select the ESP32WROVER Virtual Device file previously downloaded (all virtual devices have the .vde extension).Finish. The ESP32WROVER Virtual Device is successfully installed.File > Import... > General > Existing Projects into Workspace > Select archive file and select the downloaded archive. Window > Show View > Project Explorer. Your first applications are loaded, and ready to run:
com.microej.demo.hellocom.microej.example.bluetooth.hellocom.microej.example.iot.ssl.rest.headless
com.microej.demo.hello.
Run As > MicroEJ Application.VDE-BLACK-ESP32WROVER-RQQAW.


115200 bps, 8N1, no handshakeThe BLACK VEE embeds a dynamic APP loader. Once flashed, the ESP32WROVER is capable of dynamically load (link and run) the APP. You won’t need to reboot the device.
JP7 jumper is set to USB_5V.esptool python script from the ESP-IDF is needed./components/esptool_py/esptool/esptool.pypython -m pip install pyserialpython.exe ESPTOOLSXXX/components/esptool_py/esptool/esptool.py --chip esp32 --port COMXXX --baud 921600 --before default_reset --after hard_reset write_flash -z --flash_mode dio --flash_freq 40m --flash_size detect 0x1000 bootloader_1.1.1.bin 0x8000 partitions_microej_multiapp_1.1.1.bin 0x10000 BLACK-ESP32WROVER-RQQAW-1.1.1.bin
/usr/storage/features/EspressifLauncher/wifi.properties.list, and fill out your WiFi Access Point information (no need to add security settings).

They are many ways to download an APP to a Powered by MicroEJ device: from an APP Store, push/pull mode, etc. For this first application, we shall use a simple one step process:
MICROEJ SDK uses the concept of Runners to launch the executions of commands (all Runners are accessible using the Windows > Show views > Others...General > Runners or simply by clicking the  icon. We shall create a Runner to initiate the download. You should have already launched the
 com.microej.demo.hello application once, if not, do it now, we will reuse the Runner already created.
Run > Run Configurations..., select com.microej.demo.hello HelloEntryPoint and duplicate it thanks to the toolbar.
com.microej.demo.hello HelloEntryPoint (1).Deploy com.microej.demo.hello HelloEntryPoint.Execution to Execute on Device and the Settings to Local Deployment to Local Deployment (Socket)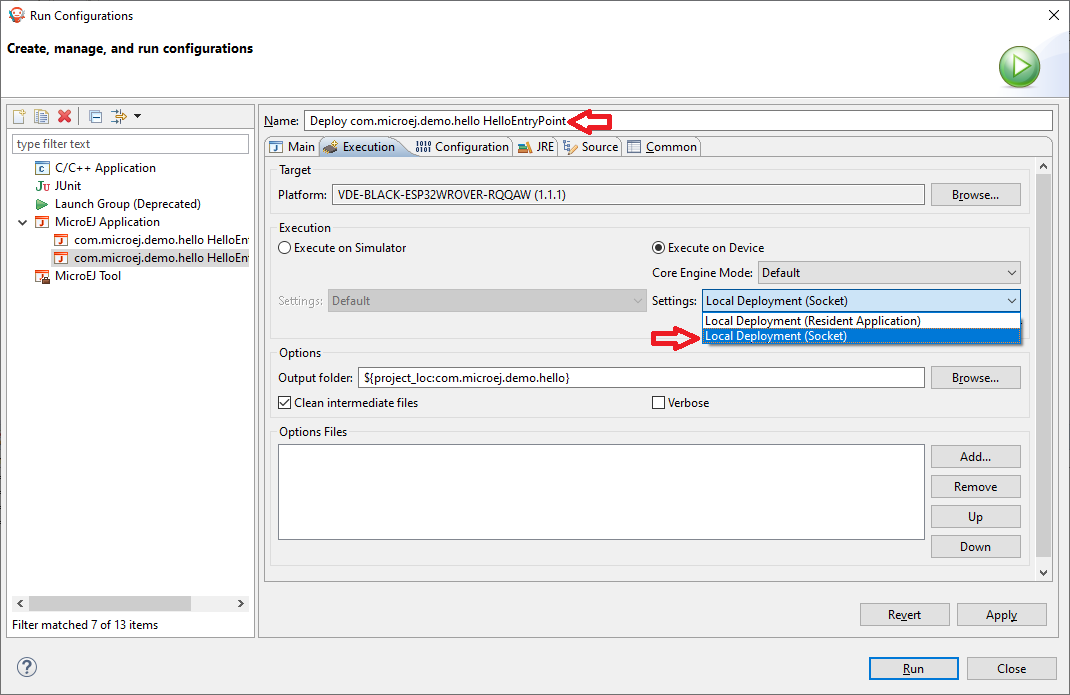
Configurationtab to provide the runner with the board IP (the one displayed on the screen).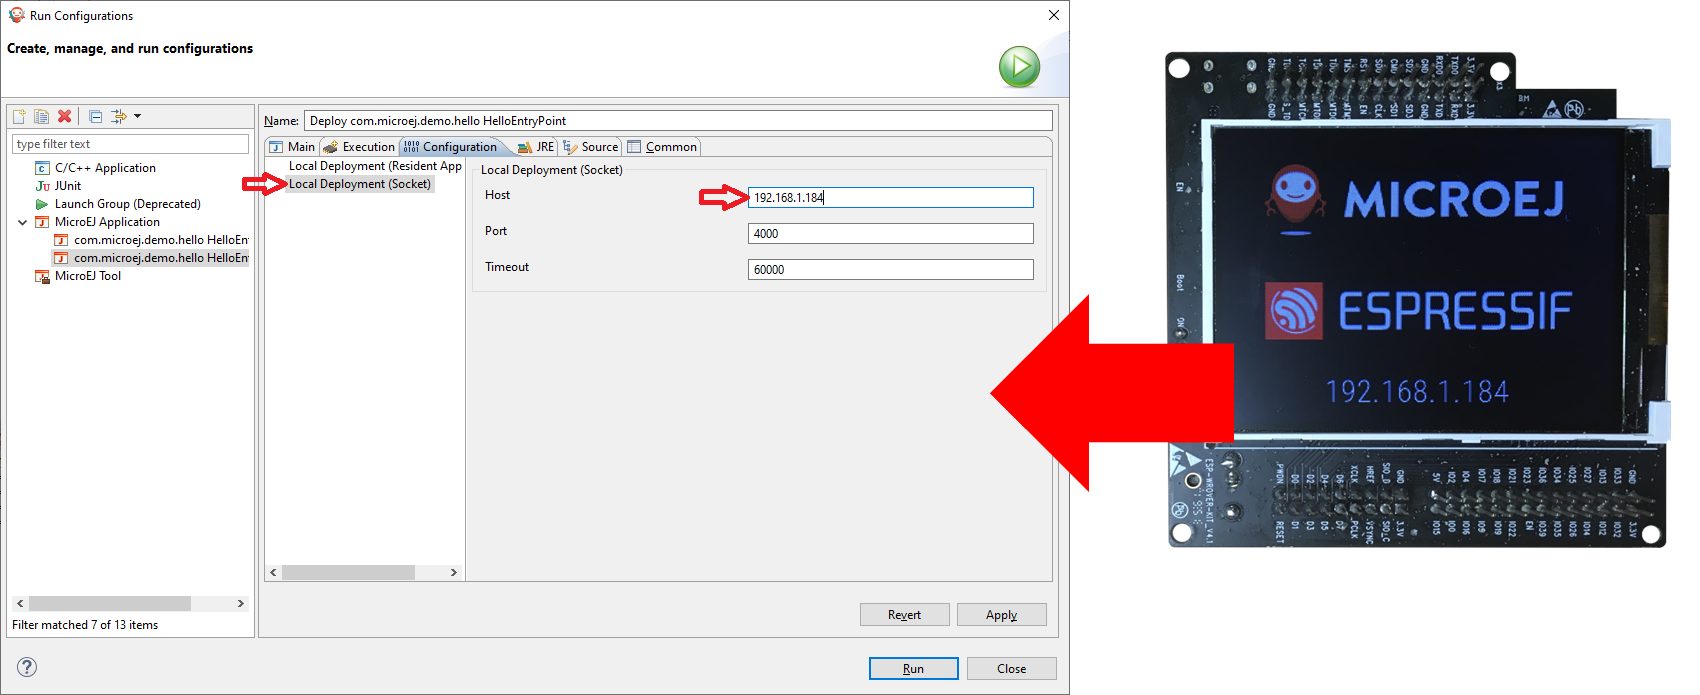
IP_OF_THE_BOARD:4001. You can start and stop the Hello application. The application is installed on the filesystem, so on reboot, you can start it again using the Forge Connect APP (on-board remote service).

This is an optional step and another way to deploy an APP to a real device. WPK files are packages containing all the resources of your application, to obtain a WPK and
com.microej.demo.hello project and right click to select Build Module.
C:\Users\YOUR_USER_NAME\.microej\workspaces\MicroEJ-SDK-19.05\com.microej.demo.hello\target~\artifacts\hello.wpkcom.microej.demo.hello project being selected, right click to select Run As > Run Configuration....
MicroEJ Tools, then right click New. This creates a new Runner. Give it a name, such as Download Hello APP, then select the communication means with the board: WPK Local deployment over Socket.
Configurationtab to provide the runner with the board IP (the one displayed on the screen), and the hello.wpk file using the browse button.
Extend your application with communication, in this suite of examples that explores the following subjects:
Learn how to create and extend your MICROEJ VEE in order to start prototyping your embedded device. You may also access more resources and examples on Embedded GUI and IoT Connectivity on the dedicated pages.

Tips and tricks, insights and discussions…
MicroEJ community helps you solve your challenges!