![]()
![]()
In this section, you will learn how to:
〉 build an existing VEE Port for the ESP32-WROVER-KIT V4.1 development board,
〉 run an application on the ESP32-WROVER-KIT V4.1 development board Virtual Device,
〉 run the same application on your ESP32-WROVER-KIT V4.1 development board.
In case you are not familiar with MicroEJ, please visit Discover MicroEJ to understand the principles of our technology.

This Getting Started is separated in two main parts.
The first part consists of running a demo application on the Virtual Device. All you need is:
〉 an Internet connection to access Github repositories & MicroEJ Central Repository.
〉 MICROEJ SDK 21.11 installed (download below)
The second part consists of running the same demo application on your device. For that you will need:
〉 the ESP32-WROVER-KIT V4.1 development board,
〉 the Espressif toolchain. You will be guided on how to install the toolchain later.
〉 Start MICROEJ SDK.
〉 Select an empty workspace.
If you launched the SDK for the first time and you are not familiar with Eclipse workspaces, select the default one and press OK.
If not, create an empty directory and select it as a workspace.
〉 Select the MicroEJ repository where the MicroEJ architectures will be imported.
If you launched the SDK for the first time and you are not familiar with MicroEJ repositories, select the default one and press OK.
If not, create an empty directory and select it as a workspace.
〉 Select Help > Check for Updates and install the latest SDK version by following the Update SDK Version instructions. You will be prompted to restart the SDK.
〉 Close the Welcome page.
You are now ready to import the projects.
Download the VEE Port sources using the following command. Clone it at the root of your computer to avoid issues with long paths, otherwise you could have some files not found during the build.
git clone -b 2.1.0 --recursive https://github.com/MicroEJ/VEEPort-Espressif-ESP-WROVER-KIT-V4.1.git
If you don’t have Git installed, you can download the source code directly from our GitHub Repository. Then you can click on Code > Download ZIP. In this case, you will not have the Espressif toolchain installed. If you want to run an application on your device, you will have to install it during the Setup your BSP steps.
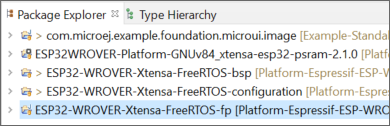
Import the projects in the SDK’s workspace:
〉 Select File > Import > General > Existing Projects into Workspace.
〉 Point Select root directory to where you cloned the sources.
〉 Click on the Finish button.
Your first VEE Port is imported in your workspace and you can now build it.
〉 Right click on ESP32-WROVER-Xtensa-FreeRTOS-configuration.
〉 Select Build Module.
The build starts. It may takes few minutes. Then the project ESP32WROVER-Platform-GNUv84_xtensa-esp32-psram-2.1.0 is automatically refreshed and it compiles without error.
Your first VEE Port is built and ready to be used for simulation.
Download the Examples of Foundation Libraries sources using the following command:
git clone -b 49.1.0 https://github.com/MicroEJ/Example-Standalone-Foundation-Libraries.git
If you don’t have Git installed, you can download the source code directly from our GitHub repository. Then you can click on Code > Download ZIP.
Import the projects in the SDK:
〉 Select File > Import > General > Existing Projects into Workspace.
〉 Point Select root directory to the directory com.microej.example.foundation.microui.image available where you cloned the sources.
〉 Click on the Finish button.
The application project com.microej.example.foundation.microui.image is imported in your workspace. After dependencies resolution it should compile without errors. This application will display a list of images.
At this stage, your SDK’s workspace contains:
〉 a VEE Port for ESP32-WROVER-KIT V4.1 development board,
〉 the image example application.
You are now ready to launch your first application on the Virtual Device:
〉 Select the com.microej.example.foundation.microui.image project,
〉 Run the image application by following the Run on MicroEJ Simulator instructions.
The Virtual Device starts and executes the image example application.

Now you know how to run an application on a Virtual Device.
If you want to learn how to integrate the VEE Port in the BSP and run an application on your ESP32-WROVER-KIT V4.1 development board, you can continue this Getting Started: Launch Image Example on your ESP32-WROVER-KIT V4.1 development board.
Otherwise, look at other examples and resources about MicroEJ technology in MicroEJ Insights section.
This chapter takes approximately one hour and will take you through the steps to set up and build the Espressif BSP.
To complete this section, you may request a 30 days Evaluation License and install an activation key.
Before deploying the application on your board, you must check that your BSP is correctly set up.
To do so, the VEE Port comes with a precompiled application.
If you did not use Git to get the VEE Port sources during 1.1 – Build a VEE Port for the ESP32-WROVER-KIT V4.1 Development Board section, please install the Espressif Toolchain.
〉 Download the Espressif Toolchain.
〉 Launch the installer executable (on Windows, start esp-idf-tools-setup-offline-4.3.2.exe) and follow the installation steps. You will find more information about the ESP-IDF Tools Installer in the Espressif documentation.
〉 By default it is installed in the C:\Espressif directory.
〉 Go to the installation directory.
〉 Copy esp-idf-v4.3.2 folder located in the framework directory.
〉 Paste it in the ESP32-WROVER-Xtensa-FreeRTOS-bsp/sdk located in the VEE Port sources.
〉 Delete esp-idf folder located in ESP32-WROVER-Xtensa-FreeRTOS-bsp/sdk directory.
〉 Rename the folder esp-idf-v4.3.2 to esp-idf.
Your Espressif Toolchain is installed, you can resume this Getting Started.
Install your C compilation toolchain:
〉 Open a terminal, execute install.bat script located in ESP32-WROVER-Xtensa-FreeRTOS-bsp/sdk/esp-idf directory. This script will install the required tools (it may take a few minutes).
〉 Open a terminal, execute export.bat script located in ESP32-WROVER-Xtensa-FreeRTOS-bsp/sdk/esp-idf directory.
〉 By default, it will install the IDF tool in the %USERPROFILE%\.espressif directory.
If you installed the Espressif Toolchain manually, by default the IDF tool is installed in the C:\Espressif directory.
〉 Connect the USB connector of the board to your computer with a USB cable by following the power supply instructions.
〉 Open your device manager to get the COM port where your board is connected to.
〉 Setup the environment variables in the BSP of the VEE Port located in ESP32-WROVER-Xtensa-FreeRTOS-bsp/project/microej/scripts folder:
• Rename the file set_local_env.bat.tpl to set_local_env.bat.
• Set IDF_TOOLS_PATH. It is the IDF tool path (e.g. %USERPROFILE%\.espressif).
• Set ESPPORT. It is the COM port retrieved previosuly (e.g. COM4).
〉 Open a terminal, execute the build_no_ota_no_systemview.bat script located in ESP32-WROVER-Xtensa-FreeRTOS-bsp/project/microej/scripts directory. Wait for the build script to finish (it may take a few minutes).
This build script disables the System View tracing. If you want to use System View, please refer to the BSP Compilation instructions.
〉 Open a terminal, execute the run.bat script located in ESP32-WROVER-Xtensa-FreeRTOS-bsp/project/microej/scripts directory.
〉 The firmware is starting. Please wait for the final message:
Leaving...

Hard resetting via RTS pin...

Done
Congratulations, you setup your BSP and are now ready to discover how to build and flash a MicroEJ application. If you want further informations about the BSP Setup, please refer to the README instructions.
Back to the SDK:
〉 Go to Run > Run Configurations... > MicroEJ Application.
〉 Select com.microej.example.foundation.microui.image ExampleImages launcher created previously during the simulation.
〉 In the Execution tab, select Execute on Device.
〉 Click on the Run button.
〉 The run stops with the following message:
[INFO ] Launching in Evaluation mode. Your UID is XXXXXXXXXXXXXXXX.

[ERROR] Invalid license check (No license found).

FAIL

Java returned: -1
〉 Copy the UID. It will be required to activate your Evaluation license.
Request your Evaluation license:
〉 Request your Evaluation license by following the Request your Activation Key instructions. You will be asked to fill the machine UID you just copied before.
〉 When you have received your activation key by email, drop it in the license directory by following the Install the License Key instructions.
Now your SDK license is installed, you can launch your application build again.
〉 Go to Run > Run Configurations... > MicroEJ Application.
〉 Select com.microej.example.foundation.microui.image ExampleImages launcher.
〉 Click on the Run button.
The application file (.o) has been generated in the folder ESP32-WROVER-Xtensa-FreeRTOS-bsp\projects\microej\platform\lib.
〉 Open a terminal and go to ESP32-WROVER-Xtensa-FreeRTOS-bsp/project/microej/scripts folder.
〉 Execute build_no_ota_no_systemview.bat script to build the BSP.
〉 The Firmware has been build and is ready to be flashed on the hardware.
〉 Execute run.bat script to flash the board.
〉 Once the Firmware has been flashed, you should see the Image Example application running on your board.

To discover insights about MicroEJ technology, please follow some of the entry points below. You will find useful links to our documentation and our GitHub. You will also discover important feature of the MicroEJ technology.
At this point, you can try to run other examples on your VEE Port. Here is an exhaustive list of them so that you can go further in the MicroEJ technology:
〉 Understand How to Build a Firmware: it is a document that describes the components, their dependencies and the process involved in the build of a Firmware.
〉 Get Started With GUI: it is a guided tutorial to get the basics concepts of our UI. See more... • The ESP32-WROVER-KIT V4.1 development board does not have a touch screen so there are some parts of this tutorial that can not be applied to your board (e.g. Event Handling).
〉 Create your First Native Method: it is a tutorial that describes how to add a native call to your Java application. See more... • Before making this tutorial, take a look at our documentation to understand the Simple Native Interface (SNI). • To run the example on your Virtual Device, please refer to the Building for the simulator instructions. • To run the example on your board, please refer to the Running the application on target instructions until the Fixing the linker error instructions. • This tutorial has been made for another VEE Port, so there is different instructions for the Fixing the linker error part with ESP32-WROVER-KIT V4.1 development board: ◦ Create the folder ◦ Copy NativeCCallExample.c file in this new folder. ◦ Edit ◦ Now you can build your BSP and flash the board. ◦ To check that the example is working, please refer to the Checking the behavior instructions.
java-natives/src in the ESP32-WROVER-Xtensa-FreeRTOS-bsp/projects/microej directory.CMakeLists.txt file located in ESP32-WROVER-Xtensa-FreeRTOS-bsp/project/microej/main folder by adding the line "../java-natives/src/NativeCCallExample.c" in the set(srcs) method.
〉 How to use Networking libraries: it is an example of a simple helloworld using NET with a server and a client. See more... • Get your IP address, then please refer to the Configuration and the Run on MicroEJ Simulator instructions. • If you want to run this example, there are some changes to make in the Java application because ESP32-WROVER-KIT V4.1 development board is using Wi-Fi connection and this example is made for Ethernet connections. Below you will find the files that you have to edit: ◦ Open ◦ Delete the three following lines: ◦ Replace them with the following dependency: ◦ Save the file and it will import libraries needed to use the Wi-Fi. ◦ Open ◦ Add the two following lines at the beginning of the ◦ Replace ◦ Add the following line at the end of the ◦ Save the file. ◦ Make the same changes for the • If you want to run this example on your Virtual Device: ◦ Launch the NET example on your Virtual Device, please refer to Run on simulator instructions. ◦ If you got an ◦ Replace ◦ Relaunch the NET example on your Virtual Device. • If you want to run this example on a device, set up the WiFi on the ESP32-WROVER-KIT V4.1 development board: ◦ Connect the microSD card of your ESP32-WROVER-KIT V4.1 development board to a computer. ◦ Edit/Create ◦ Put back the microSD card in the ESP32-WROVER-KIT V4.1 development board. ◦ Launch the NET client on your device, please refer to Run on device instructions. If you want to run the NET server on your device, do the same instructions but in the file
module.ivy file to update the dependencies.<dependency org="ej.api" name="edc" rev="1.2.3"/>
<dependency org="ej.api" name="bon" rev="1.2.3"/>
<dependency org="ej.api" name="net" rev="1.0.2"/><dependency org="ej.library.iot" name="wifi-util" rev="2.1.1" />ExampleClient.java file located in src/main/java/com/microej/example/foundation/net/helloworld directory.main function, replace mySSID and myPassword with your Wi-Fi parameters:WifiNetworkManager wifiManager = new WifiNetworkManager();
wifiManager.joinAccessPoint("mySSID", "myPassword",SecurityMode.Enterprise_NO_security, 30000); public static void main(String[] args) { by public static void main(String[] args) throws IOException { line.main function:wifiManager.leaveAccessPoint();ExampleServer.java file located in src/main/java/com/microej/example/foundation/net/helloworld directory.I/O error (err: -255) exception, go to wificonfig.properties file located in wifi directory.ej.ecom.wifi.mock.ap.0.ssid value with your Wi-Fi value./usr/storage/features/EspressifLauncher/wifi.properties.list, and fill out your WiFi Access Point information (no need to add security settings).

Make sure to remove the # at the beginning of the two lines.ExampleServer.java available in the same directory. In that case you will have to get the IP address of your board available on the logs of the NET server application.
〉 How to use MQTT: it is an example of how to use NET libraries with MQTT. See more... • For this example, you can use this MQTT Web socket Client. You can keep the default configuration. Keep the host name in mind. ◦ Click on the ◦ Click on the ◦ Replace ◦ Click on the ◦ It is now listening to the • Replace • If you want to run this example, there are some changes to make in the Java application because ESP32-WROVER-KIT V4.1 development board is using Wi-Fi connection and this example is made for Ethernet connections. Below you will find the files that you have to edit: ◦ Open ◦ Add the following dependency: ◦ Save the file and it will import libraries needed to use the Wi-Fi. ◦ Open ◦ Add ◦ Add the following lines at the beginning of the ◦ Add the following line at the end of the ◦ Save the file. • If you want to run this example on your Virtual Device: ◦ Launch the MQTT example on your Virtual Device, please refer to Run on simulator instructions. ◦ If you got an ◦ Replace ◦ Relaunch the MQTT example on your Virtual Device. • If you want to run this example on a device, set up the WiFi on the ESP32-WROVER-KIT V4.1 development board: ◦ Connect the microSD card of your ESP32-WROVER-KIT V4.1 development board to a computer. ◦ Edit/Create ◦ Put back the microSD card and reconnect the ESP32-WROVER-KIT V4.1 development board. ◦ Launch the MQTT example on your device, please refer to Run on device instructions.
Connect button.Add New Topic Subscription button.testtopic/# by microej in the Topic section.Subscribe button.microej topic where the MQTT example will publish.test.mosquitto.org by your host name in the variable BROKER of the HelloWorldConstants.java file.module.ivy file to update the dependencies.<dependency org="ej.library.iot" name="wifi-util" rev="2.1.1" />PublisherBackgroundService.java file located in src/main/java/com/microej/example/iot/mqtt directory.public WifiNetworkManager wifiManager; variable to the PublisherBackgroundService class.onStart function, replace mySSID and myPassword with your Wi-Fi parameters: try {
wifiManager = new WifiNetworkManager();
wifiManager.joinAccessPoint("mySSID", "myPassword", SecurityMode.Enterprise_NO_security, 30000);
} catch (IOException e1) {
e1.printStackTrace();
}onStop function: try {
wifiManager.leaveAccessPoint();
} catch (IOException e) {
e.printStackTrace();
}I/O error (err: -255) exception, go to wificonfig.properties file located in wifi directory.ej.ecom.wifi.mock.ap.0.ssid value with your Wi-Fi value./usr/storage/features/EspressifLauncher/wifi.properties.list, and fill out your WiFi Access Point information (no need to add security settings).
Make sure to remove the # at the beginning of the two lines.
Now you can take a look at our MICROEJ development documentation and read parts useful to the growth of your software solution.
Below you can find some important chapters:

On our GitHub, there are some examples, MicroEJ VEE Port sources, or documentation about embedded challenges. Here are some examples:

Here is a list of different features about MicroEJ that could be interesting for you:

If you have any issue, you can go to our forum and look if there is already a topic about this issue. If not, ask us the question and our experts will be happy to answer.

How can we help you? Our technical support team is here to help if you have any issue or technical question about MicroEJ. Send your technical support request by email and we’ll connect you to one of our experts.