![]()
![]()
Develop Java/C applications on STMicroelectronics STM32F746G-DISCO development board with MicroEJ Software Development Kit.
Follow the steps* below to get your first app running on both a virtual device, and a real device (final hardware). In case you are not familiar with MicroEJ, please visit Discover MicroEJ to understand the principles of our technology.
*For your information, this edition is obsolete with the latest SDK, which is not recommended for new designs. Contact us for the newest SDK.
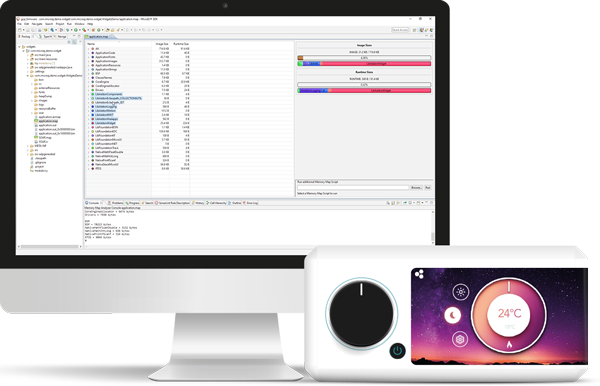
MICROEJ SDK is an IDE built on Eclipse for creating feature-rich applications for MicroEJ Virtual Execution Environment (VEE).
MICROEJ SDK runs on all popular desktops operating systems: Windows (7, 8, 8.1, 10), Linux, macOS.
A Java™ Runtime Environment 8 is needed on your host computer for running MICROEJ SDK. Download Java™ Runtime Environments
Click the below button to download the installer package corresponding to your host computer OS (about MICROEJ SDK download).
Launch.OK.Window > Preferences > MicroEJ > Virtual Device menu.Import... button and select the Virtual Device file previously downloaded (all virtual devices have the .vde extension).Finish. The MicroEJ Virtual Device is successfully installed.File > Import... > General > Existing Projects into Workspace > Select archive file and select the downloaded archive.com.microej.demo.hello.com.microej.example.iot.ssl.rest.headless.com.microej.demo.hello.Run As > MicroEJ Application.VDE-BLUE-STM32F746GDISCO-CXLQH.
com.microej.example.iot.ssl.rest.headless.Then Run As > MicroEJ Application.VDE-BLUE-STM32F746GDISCO-CXLQH.=============== [ Initialization Stage ] =============== =============== [ Converting fonts ] =============== =============== [ Converting images ] =============== =============== [ Launching on Simulator ] =============== https example INFO: {"headers":{"user-agent":"Resty/0.1 (Java)","accept":"application/json","host":"postman-echo.com","x-forwarded-proto":"https","x-forwarded-port":"443"},"args":{},"url":"https://postman-echo.com/get"} https example INFO: user-agent: Resty/0.1 (Java) host: postman-echo.com https example INFO: =========== POST REQUEST =========== https example INFO: {"form":{},"headers":{"user-agent":"Resty/0.1 (Java)","content-length":"20","accept":"application/json","host":"postman-echo.com","x-forwarded-proto":"https","content-type":"text/plain; charset=UTF-8","x-forwarded-port":"443"},"files":{},"json":null,"data":"My POST request data","args":{},"url":"https://postman-echo.com/post"} https example INFO: Data sent for POST request: My POST request data https example INFO: =========== PUT REQUEST =========== AbstractPage.renderContent() AbstractPage.renderContent() https example INFO: {"form":{},"headers":{"user-agent":"Resty/0.1 (Java)","content-length":"19", "accept":"application/json","host":"postman-echo.com","x-forwarded-proto":"https","content-type":"text/plain; charset=UTF-8","x-forwarded-port":"443"},"files":{},"json":null,"data":"My PUT request data","args":{},"url":"https://postman-echo.com/put"} https example INFO: Data sent for PUT request: My PUT request data https example INFO: =========== DELETE REQUEST =========== https example INFO: {"form":{},"headers":{"user-agent":"Resty/0.1 (Java)","accept":"application/json","host":"postman-echo.com","x-forwarded-proto":"https","x-forwarded-port":"443"},"files":{},"json":null,"data":{},"args":{},"url":"https://postman-echo.com/delete"}
For power supply, you can select the ST-LINK connector by setting jumper JP1 on the back of the board, next to the reset button. You must select “CN14 USB ST-LINK” (factory settings) when you use the STM32 ST-LINK utility, you need a cable with a “Mini-B” connector.
115200 bps, 8N1, no handshakeExternal Loader > Add External Loader.N25Q128A_STM32F746G-DISCO loader and press Validate.Target > Program.com.microej.demo.hello.Run As > MicroEJ Application.VDE-BLUE-STM32F746GDISCO-CXLQH.Run Configuration, you can stop the Virtual Device.Run Configuration.Execution mode to Execute on Device, Core Engine Default and Settings Local Deployment (Socket)Configuration tab in Local Deployment (Socket) insert the IP of the STM32F746G-DISCO in the Host parameter. You should have the IP displayed on the screen of the STM32F746G-DISCO (leave the other parameters unchanged).com.microej.example.iot.ssl.rest.headless.Run As > MicroEJ Application.VDE-BLUE-STM32F746GDISCO-CXLQH.Run Configuration, you can stop the Virtual Device.Run Configuration.Execution mode to Execute on Device, Core Engine Default and Settings Local Deployment (Socket)Configuration tab in Local Deployment (Socket) insert the IP of the STM32F746G-DISCO in the Host parameter. You should have the IP displayed on the screen of the STM32F746G-DISCO (leave the other parameters unchanged).=============== [ Initialization Stage ] ===============
=============== [ Converting fonts ] ===============
=============== [ Converting images ] ===============
=============== [ Launching on Simulator ] ===============
https example INFO: {"headers":{"user-agent":"Resty/0.1 (Java)","accept":"application/json","host":"postman-echo.com","x-forwarded-proto":"https","x-forwarded-port":"443"},"args":{},"url":"https://postman-echo.com/get"}
https example INFO: user-agent: Resty/0.1
https example INFO: =========== POST REQUEST ===========
https example INFO: {"form":{},"headers":{"user-agent":"Resty/0.1 (Java)","content-length":"20","accept":"application/json","host":"postman-echo.com","x-forwarded-proto":"https","content-type":"text/plain; charset=UTF-8","x-forwarded-port":"443"},"files":{},"json":null,"data":"My POST request data","args":{},"url":"https://postman-echo.com/post"}
https example INFO: Data sent for POST request: My POST request data
https example INFO: =========== PUT REQUEST ===========
AbstractPage.renderContent()
AbstractPage.renderContent()
https example INFO: {"form":{},"headers":{"user-agent":"Resty/0.1 (Java)","content-length":"19","accept":"application/json","host":"postman-echo.com","x-forwarded-proto":"https","content-type":"text/plain; charset=UTF-8","x-forwarded-port":"443"},"files":{},"json":null,"data":"My PUT request data","args":{},"url":"https://postman-echo.com/put"}
https example INFO: Data sent for PUT request: My PUT request data
https example INFO: =========== DELETE REQUEST ===========
https example INFO: {"form":{},"headers":{"user-agent":"Resty/0.1 (Java)","accept":"application/json","host":"postman-echo.com","x-forwarded-proto":"https","x-forwarded-port":"443"},"files":{},"json":null,"data":{},"args":{},"url":"https://postman-echo.com/delete"
Extend your application with communication, in this suite of examples that explores the following subjects:
This demo illustrates the Widget library (ej.widget, ej.style, ej.animation, ej.color) based on MicroUI 2 and MWT 2.
Learn how to create and extend your MICROEJ VEE in order to start prototyping your embedded device. You may also access more resources and examples on Embedded GUI and IoT Connectivity on the dedicated pages.

Tips and tricks, insights and discussions…
MicroEJ community helps you solve your challenges!